Tuesday, 29 October 2013

Baking Beauties Tag

Hey! Today's post is a tag I just couldn't resist passing up! I was indirectly tagged by Jessica-Leigh at Dungarees and Donuts and since I love baking, I thought why not?

I'm also already missing the Great British Bake Off, since the final was last week! I won't spoil the result in case you still haven't seen it (where have you been?!) but how good did that cake look!

image credit to Hayley and Charlotte


1. What is the first thing you remember baking? 
Probably Christmas cake with my mum, it's now our yearly tradition!

2. What was the last thing you baked? 
A coconut and lime cake, my parents' favourite!

3. Something you've always wanted to bake?
I've always wanted to have a go at making a gingerbread house! They look so much fun to decorate.


4. Tell us about a time you baked something and it went ridiculously wrong.
I once got the quantities completely wrong for a Red Velvet cake, and by trying to correct it ended up with some crazy new invention of cake ...and not in a good way.

5. Be honest, do you lick the spoon?

 ...Yes. And the bowl. (What else am I going to do while the cake is in the oven?)

7. What baking success are you most proud of? 
 Finally getting French macarons right! Paul Hollywood and Mary Berry would be proud.

8. Do you tidy up as you go along or leave one big mess until the end?
Definitely one big mess at the end! And then I despair at the sight of all that washing up...


9. Do you use recipe books or get them online? 
A bit of both really! I like to go to trusted sources for my recipes, chefs and bakers who's recipes I've tried before and have a better idea that their recipe will work!

10. Do you stick to the recipe or do you experiment a little?
 For the first time, I always stick to the recipe, but then when I'm a bit more familiar I'll start to swap ingredients and flavours.

11. Who are your favourite food bloggers?

12. What is your favourite thing to bake?
Profiteroles! I like making choux pastry, and there are various steps with making profiteroles so it keeps it interesting!


Since I sort of tagged myself in this, I'd now like to tag anyone else who wants to have a go at this tag! If you do, leave me a comment and a link so I can read your answers!

xxx

Sunday, 27 October 2013

Recent Purchases #2

Hey! Today I thought I'd share with you the things that I have been buying over the last couple of weeks. Not really a haul since there were several shopping sessions, but I feel like everything needs a mention!


The first thing I picked up was Kiehl's Rare Earth Pore Refining Toner (from my wishlist), as I was in need of a new toner and this one is supposed to be great at helping keep oil at bay.
I also decided to splurge my saved up Boots points on this gift set from Benefit, containing the four items you can see on the left of the photo above. Benefit Let's Make Lovely contains mini versions of Hoola Bronzer (which was on my wishlist), They're Real mascara, the Porefessional (which I recently ran out of) and It's Potent eye cream. I also got a sample of their Hello Flawless foundation to try out, although I'm feeling a tad cautious because the last Benefit foundation I had (the Playsticks one) made me break out!


I also met up with a couple of lovely bloggers this weekend (Becka and Ella) and proceeded to purchase a few guilty treats. (Everything else is going on my Christmas list now, promise!)

The first things I bought were actually bargains to be honest, from good old Primark: the first being a red skater dress and some DC comic print pyjamas which were on sale for just £3! My next purchase was at completely the other end of the scale as we next went into MAC... but I have been wanting a decent contour brush to use with Benefit Hoola so I bought the 168 Large Angled Contour Brush. Another thing that I have been lusting after for even longer (since I first saw it in a magazine back in August!), is the Nars Eye Paint in Ubangi so with them finally being stocked in Space NK I bought it (I was very tempted to buy the colour Snake Eyes, but restrained myself).

Finally, I knew I needed a body scrub so I opted to try this sugar scrub from Lush. I also picked up a lip scrub while I was in there, and even though Christmas is quite a while away, the Santa one tastes just like cola sweets!

apologies for the blurriness of this photo!
I've also picked up a few things from the New Look sale, and I'll try and do some OOTD posts so you can see them a bit better. I got three tops (all utter bargains at £6, £3 and £6 respectively) and a new pair of khaki skinny jeans. I love the quality and fit of New Look's jeans, and these are from the super-soft range making them really comfortable, plus they were a steal at just £10!

What have you been buying recently?

xxx

Wednesday, 23 October 2013

Review: Unii Palette

Hey! I feel like I haven't properly reviewed anything for ages, so today I'm going to do just that!

At the beginning of summer, I demolished my Urban Decay NYC Palette as it was bulky and impractical, and opted to depot the eyeshadows into something easier to travel with.

The concept of most custom palettes involves using a large magnet on the base of the palette and then sticking magnets to the bottom of your depotted products and when placed in the palette the magnets will attract and keep them in place.

The first custom palette I found was actually the Z Palette, and I was going to get the small version and fit all 16 shadows in snugly, but the dimensions were just a teeny bit too small to fit them all. It was then that I found the Unii Palette, and decided to get this instead, because it had the added bonus of a huge mirror!


So, onto the palette itself! I chose the Midnight colour, which is black with hints of gold shimmer running through (which my camera hasn't picked up very well). As I said before, I wanted this for travelling with so does it do it's job?

PROS
It is a nice size palette for depotting a wide variety of products into, I only had eyeshadows to depot but the space would allow for blushers, bronzers or maybe even a pressed face powder! (I've put some mini eyeshadow brushes in mine) The huge mirror is a massive plus in my books, particularly if its purpose is to travel with. There is also a handy thumb grip, which I don't personally use, but I can see that some people would find it beneficial.

CONS
Unfortunately for me (and four eyeshadows), my palette didn't survive my journey back to uni. The palette itself is fine, but some of the eyeshadows had shifted and got smashed. I can however say that their customer service for this was very helpful, and I was offered a partial refund while being reassured this isn't usually the case with their palettes.

So overall, this is a great palette for depotting shadows and saving yourself some space. I can't say that I myself would risk travelling with it again, but if this was a one-off then it should be ok for other people.

If you'd like to purchase your own Unii Palette, you can buy them here.

xxx

Friday, 18 October 2013

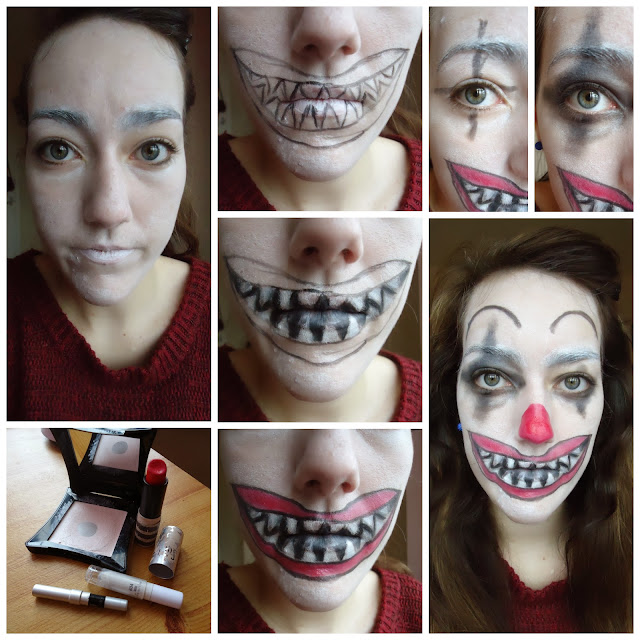
Halloween Makeup Tutorials: #bloggoween

Hey! As you may have guessed, today's post is all about Halloween and I'd like to share two makeup tutorials with you - one scary, one not-so, but both are really easy and use hardly any products! This is part of a series I'm taking part in along with other bloggers: #bloggoween. Hopefully this give you some ideas with plenty of time for Halloween this year.

So, without any further waffle: onto the tutorials!

Sugar Skull

First, cover your eyebrows and apply concealer to your lips, then draw large circles around each eye, and fill in with a colour of your choice. Re-outline with a thicker line and draw petals around the edges. For the mouth, draw a fake smile extending from the corners of your mouth, and draw small vertical lines across this. Add a cobweb effect across your forehead, and complete with a black nose.

This look would be great with a floral crown if you still have one around from summer festivals, or simply a rose tucked behind the ear! If you were feeling fancy; you could add glitter or rhinestones to the petals around the eyes, or if like me you prefer to be scary at Halloween; you could zombify this look with some white contacts and some grey contouring - you could even add some fake blood if you want!


Killer Clown

Start with a white base, cover your brows, then draw an outline of an oversize mouth and fill in the teeth. Outline this with a red lipstick, and finish the edges with a black eyeliner. For the eyes, use a black eyeliner to draw a cross over one eye then smudge out. Use black eyeshadow to continue smudging out the shape, and apply messily all over the other lid. Finally, use red lipstick to add a red nose and black eyeliner for eyebrows.

All you'd really need to make this work is a red clown wig, but if you wanted some extra horror - fake blood wouldn't go amiss!


Hope you found some inspiration here!

xxx

Wednesday, 9 October 2013

Nail Art: Glitter Aztec

Hey! Today I thought I'd share a really quick and easy nail art, that I really like to do this time of year. The design works well in pastels in brights for warmer weather, but there's something about using a glitter polish which makes it so Autumn-y.

The other thing I love about this design is that it can help to make your nails look longer (or at least I think so). So, enough chat - onto the nail art!


Step 1: Apply base coat, and paint your nails a dark autumnal colour.

Step 2: Paint a thick stripe in a glittery colour down the middle of each nail.

Step 3: Use a striper to add black lines either side of the glittery stripe.

Step 4: Add a zig-zag pattern down the middle of the glittery stripe and in between the black lines you have just painted.

Step 5: Finish with a top coat.


Super easy to do, and takes hardly any extra time compared to painting your nails normally!

Hope you enjoy this design!

xxx


PS. Just a quick update, I've got a brand new swanky blog design courtesy of Amy at srslydsgn.com (thanks again!). I actually won this in a giveaway, but Amy's prices are very reasonable and I would highly recommend her services if you're on the lookout for a fresh blog update!

With my new blog layout, I've also now got a few extra features such as my blog button - and if you'd like to do a button swap, feel free to drop me a tweet/email.

Wednesday, 2 October 2013

EOTD: MAC Cranberry

 Hey! I mentioned in my last post that this season I want to experiment with plum and berry coloured eyeshadows, so today I'm doing just that!


I've incorporated MAC's Cranberry into my normal gold smokey eye, and I really think it adds a new dimension to the whole look and brings out the hazel in my eyes.

I used the Naked 2 palette as well as MAC Cranberry and applied as follows: Half-Baked in the inner corner, Cranberry over most of the lid, YDK and Chopper blended through the crease and Busted in the outer corner. I also added a little extra Cranberry at the end with my ring finger to help make the colour stand out a little more. 

All that's left to do then is eyeliner and mascara! I think this look would be great for day or night, and would suit all eye colours. 

Would you wear this?

xxx