Sunday, 9 November 2014

MAC Star Violet Vs Cranberry

I bought MAC Cranberry eyeshadow in autumn last year, to branch out from my usual gold and bronze smoky eye colours I usually wear. I've absolutely loved using it, and it even helped me with a Bloody Mary costume once.

I bought MAC Star Violet eyeshadow just before this summer, to create pink/rose looks instead of buying the Urban Decay Naked 3 palette. 

When I unpackaged it at home, I immediately noticed the similarity between Star Violet and Cranberry and felt silly for buying essentially the same colour. But then after using them both, and swatching them I realised they are in fact not the same colour.

Star Violet (left), Cranberry (right)

Star Violet (left), Cranberry (right)
Star Violet has a much more pink (bordering onto purple territory) undertones, and is a more subtle addition to a look compared with Cranberry.

Cranberry is more pigmented, and can often require a lighter application to avoid the 'I've just been crying look' that nobody wants.

So these two eyeshadows have their differences, but should you buy them both? The answer, I think, is no. If you're specifically looking for a red eyeshadow for autumn/winter and want to create generally darker looks then get Cranberry. If you're looking for an all-year-rounder red/pink eyeshadow that is more wearable then get Star Violet.

Sunday, 26 October 2014

Halloween Makeup: Werewolf Victim


I. Am. So. Excited. For. Halloween. No seriously, I love doing halloween makeup because it's just so much more creative and fun.

If you're a bit stuck what to do, this is a great idea for both the low-budget and last-minute since you only really need to buy liquid latex and fake blood (and even that you can make at home). Oh, I suppose old clothes would be handy too for the purpose of cutting them up and adding blood to make it look like you've been attacked. But let's concentrate on the face for now.

First, you'll want to draw out an outline of where you'll want your scratches to be, mostly to give yourself an idea, because now you're going to cover them up. With tissue and liquid latex. Layered.

Important thing to note! 
Don't get liquid latex on your eyebrows, eyelid, or general eye area because this stuff hurts when you peel it off.

When you have enough layers, let that all dry (you can speed up the process with a hairdryer on gentle heat) and then add foundation and powder to blend into your skin. This won't be perfect, but your friends will be too impressed/scared to notice that.

Next, very carefully rip the tissue/latex into lines down your face (feel free to redraw the lines if that helps) and seal the edges down with a bit more liquid latex.

Now fill in those gouges with something red, be it eyeshadow or red lipstick (I used both), and then add depth to the edges with darker colours to make it look more realistic. I would also recommend adding fake blood, but I didn't have any to hand.

For a final touch, lightly dust brown/grey eyeshadow over your face to dirty it up a bit.


For other Halloween inspiration, check out these tutorials from last year, as well as this Zombie Disney look and this Bloody Mary look.

Sunday, 19 October 2014

Disappointing Products #3


Trilogy Cream Cleanser
I had a travel size of this, so decided to take it on holiday with me. I ended up not using it because it didn't make my skin feel clean, and was bizarrely clogging on my face rather than refreshing.

Nair Brazilian Spa Clay*
I used this on my legs prior to going on holiday, but found the product to be utterly useless - my leg hair grew back faster than if I'd just shaved my legs!

Lancome Artliner
I feel a bit mean about this one, since it's not a horrible eyeliner, but the spongy tip makes it seriously difficult to get close to the lash-line or do any kind of wing/cat-eye. It's an okay eyeliner which lasts a few hours but it's not very opaque and initial application can look very grey instead of black. I really don't it's worth the high price tag, there are much better eyeliners out there for your money and I had much higher expectations for this one!

Beauty Blender
There's been a lot of hype that's surrounded the beauty blender. Unfortunately, to me it just seems like a glorified sponge. It applies foundation  okay, but nowhere near as flawlessly as if I use a makeup brush, and I find myself using more product as it gets absorbed.

Sunday, 12 October 2014

September Favourites


Seriously. Where did September go? Today I thought I'd share the beauty products I've been loving recently:

Topshop Matte Bronzer in Mohawk
When I recently ran out of my Benefit Hoola bronzer, I didn't really want to splash out £23.50 for a little box of powder. I was super happy to find this matte bronzer which is a total dupe for Hoola, and is only £9 for three times as much actual product, Topshop have an absolute winner of a product here, especially as it can be a struggle to find a decent properly matte bronzer on the high-street.

Viktor Rolf Bon Bon Eau de Parfum
I bought this perfume back in April, but didn't really use it much during summer. Now though, it's my go to fragrance for both day and night. This has been one of those fragrances which people have complimented on, which is always nice!

Ciaté Nail Polishes
I've recently found a new love for Ciaté nail polishes. In particular, the colour Cookies and Cream as the perfect nude/taupe colour, this is actually a repurchase of a mini version of this colour from a magazine freebie.

Rimmel Glam Eyes Professional Liquid Eyeliner
After a disappointing experience with a different liquid eyeliner (more on that later), I needed a new one. So this was a spontaneous purchase with no prior review-reading and pleasantly surprised me by how good this little product is. For just over £5 you can get nice opaque black eyeliner, and a neat wing. It doesn't last as long as Urban Decays's 24/7 Waterproof Liquid Liner, but for a third of the price I can't really complain!

Sunday, 5 October 2014

Autumn Playlist


Firstly, how awesome is that middle album artwork? Today I thought I'd share a selection of the songs I've been listening to recently. My taste in music has definitely become more electronic/dance tunes over the last year, so if you're not really into that then this playlist probably won't be your cup of tea...

Overwerk - Control ft. Nick Nikon
Capital Cities - Center Stage
Overwerk -  Buzzin'
Cinnamon Chasers - You
Uppermost - Imagine Reality
Far Too Loud - Boom!
Anoraak - Nightdrive With You (Fear of Tigers Remix)
Cinnamon Chasers - Lights
Grum - Transport

Sunday, 28 September 2014

Duochrome Smoky Eye


I decided to have another play with MAC Club eyeshadow, because I felt that my previous look using it (found here) didn't quite capture how literally beautiful this colour is. By layering Club over a blue base (I've used Nars Ubangi Eye Paint) it really brings out the different tones in the eyeshadow, shifting it between blue, green, and brown in different lighting.

It's difficult to capture on camera, but if you have this eyeshadow seriously give it a go because it makes for a really easy smoky eye by just adding MAC Satin Taupe and some matte blue eyeshadow through the crease and in the bottom lashline.

Something else I've learnt recently that makes dark smoky eyes like this look much easier; is by applying your crease colour first and blending that out, and then applying your lid colour.

If you wanted to, you could absolutely smoke this out further but I personally prefer to keep my eyeshadow mostly within my lid space - just work with your own eye shape!

Sunday, 21 September 2014

Winged Eyeliner Made Easier

After my latest eyeliner purchase turned out to be a bit of a disappointment (more on that later), I found myself needing a new technique for applying winged eyeliner.

Step in the angled-brush-and-eyeshadow method. I spray some Urban Decay Complexion Prep Spray onto my MAC 208 brush, and then use it to apply matte black eyeshadow to the lashline and create a wing. It's difficult to explain in words how I make the wing shape, but there are loads of video tutorials on the internet and then it's basically practice, practice, practice.

It took me a while to find a brush that was was small enough to create just a subtle winged effect, but this MAC 208 does the job perfectly. This technique also works without the setting spray, but I find the finish to be less opaque and not as long-lasting.


Sunday, 14 September 2014

Turkish Lookbook

A post I would have scheduled while I was away if I had the time, is a mini collection of the outfits I'd wear on holiday. Instead, I'm sharing it now:

The Airport
A simple and comfortable outfit for travelling in; no-one wants to be taking off loads of layers and accessories when going through security!

 The Daytime
Not a part of the holiday that requires much in the way of clothing! Being the lazy person I am, I only made it to one breakfast! and the rest of the day it was lounging around the pool in a bikini and throwing on this awesome white kimono for lunch.

The Evening
When it came to packing outfits for the evening, I pretty much just threw things in my case that were summery and I wouldn't be able to wear for much longer. Nothing too fancy, just something to wear while working my way through the menu of all-inclusive cocktails...

Thursday, 11 September 2014

Chop Chop

Apologies for being off the radar lately! The past few weeks have involved finishing my summer placement, doing some exams at university, and jetting off for a VERY last minute (but much needed) holiday in Turkey.

As you can imagine, I didn't really have much time to organise any scheduled or guest posts so sorry about that. I will say though, that the recent change from two uploads a week to once (usually on a Sunday) is probably going to be more of a regular thing, as I'm starting my final year of my MEng Electronic Engineering degree and will be prioritising my time to work on that.

Anyway, today I'm sharing a bit of a makeover I had just before I went on holiday: chopping half my hair off. Previously, my hair reached my belly button, and now it's kind of a long bob sitting just below my collar bone. I also had some dark lowlights put back through, as my roots were getting ridiculous and the maintenance of blonde hair was just too much effort for me.


The story doesn't end there though. Oh no. There's a reason I went for such a dramatic haircut (and not just because Turkey was insanely hot). I've been growing my hair for the last three years with the intention of donating to www.littleprincesses.org.uk which is a charity providing wigs for children with cancer, alopecia, and other conditions leading to hair loss


The minimum donation is 7 inches, but we cut off 10 inches (plaited, so it should more when un-plaited!) and there are certain 'rules' about what hair is suitable - more details on the website if you wanted to do this yourself!

This is also why I've had a bit of a 'hair bootcamp' this summer, with weekly hair masks and treatments, just so it could be in the best condition possible to be turned into a wig.

I was definitely nervous before doing this, and the idea of someone else having my hair is a little weird; but I know that that person needs it more and I've definitely discovered that there is such a thing as too long hair!

Sunday, 24 August 2014

Nars Sheer Glow vs Sheer Matte


L-R Glow, Matte (both Mont Blanc)
I first purchased Nars Sheer Glow back in March (I think), and it quickly became my favourite foundation. Lacking an SPF made it great for photos, and the coverage/finish was lovely. A few months and an empty bottle later, I was in need of a replacement! Being the middle of summer, I opted to try the Sheer Matte foundation instead.

Having now used both, I thought I would do a little comparison post!

Packaging
The packaging is pretty much the same for both - the iconic matte black that Nars use with bold lettering - although Sheer Matte has a frosted glass bottle so you can distinguish between the two.

Shade
I can't say if this applies to all the shades in the range, but Mont Blanc is very similar for both foundations with Sheer Matte pulling ever so slightly more yellow in tone, whereas Sheer Glow is what I would call a 'perfect neutral'.

Application & Coverage
The consistency of these two is very similar (not too thick, but liquid enough to blend easily), and both foundations provide a similar amount of coverage; although I would say that Sheer Glow blends just a tiny bit easier.

Finish
Quite obviously, Sheer Matte has a much more matte finish that Sheer Glow, but I find on my skin at least that Sheer Glow isn't massively dewy but just a nice natural texture. For summer, I would recommend Sheer Matte more, purely for the fact that you would need to powder a lot less.

Staying Power
Both of these have some great staying power. I can get a good 5-6 hours wear, and longer if using a makeup setting spray. Having said that, I do find my face gets shiny faster with the Sheer Glow if I'm on a night out and dancing a lot.

Overall, it's going to be down to personal preference as to which you think is better. For the moment, that's Sheer Matte for me but I might revise this when it gets to the colder months and I inevitably have drier skin!

Sunday, 17 August 2014

Summer Empties


It can be weirdly satisfying to throw out a whole bunch of products at once. But also sad when they're all products you've loved using. Not quite the end of summer yet, but it is getting darker earlier and definitely not as warm as it has been! Just a gentle reminder that autumn is approaching...

TIGI Dirty Secret Dry Shampoo
Love the packaging, and this left way less white residue in the hair than cheaper dry shampoos.

Nars Sheer Glow
My current holy grail foundation. I replaced this with the Matte version due to warmer weather. Look out for a comparison post soon.

Benefit Hoola Bronzing Powder
Alright technically this isn't empty but it will be soon, and moving back home after my summer placement I didn't see the point in bringing the rest of the empty packaging with me. This is right to the edges now and getting to be awkward to pick up product, but for a miniature version this has done well to last nearly a year.

Urban Decay 24/7 Liquid Eyeliner
This started to run out literally in the middle of application. Picture this: one eye with perfect winged eyeliner, one without any. Not a great look. I would definitely purchase this again, but I'm tempted to try the new felt-tip version - Ink for Eyes.

bB Creme de Coco Tropical Riche Masque
After my most 'recent' hair dying session (going blonde back in April), my hair has become quite damaged towards the ends. In order to remedy this, I've been using this hair mask regularly. I'd say it's helped rather a lot.

TIGI S Factor Smoothing Lusterizer
This helps to smooth the hair, and make it easier to brush through, but I dislike the glitter particles in the product. They're not obvious in your hair, but you do end up with glittery hands, and it doesn't seem to wash off!

Argan Gold Hair Vitality Oil
Another hair product, and it happens to be my favourite hair oil. An absolute bargain too, as it's only £4 from Asda!

The Body Shop Mango Body Butter
I have a love/hate relationship with these. On the one hand I love how great they smell, but hate how greasy they make my skin feel while they take years (ish) to sink in.

La Roche Posay Effaclar AI Targeted Breakout Corrector
A staple product in my skincare routine, and the best spot treatment I've ever used.

Super Facialist Tea Flower Pore Purifying Clay Mask
As featured in my Heatwave Heroes post, I've applied this pretty much every week all summer to relieve my face of excess oil built up through the week (lovely). It's also quite fluid for a clay mask, which makes it easier to apply.

Sunday, 10 August 2014

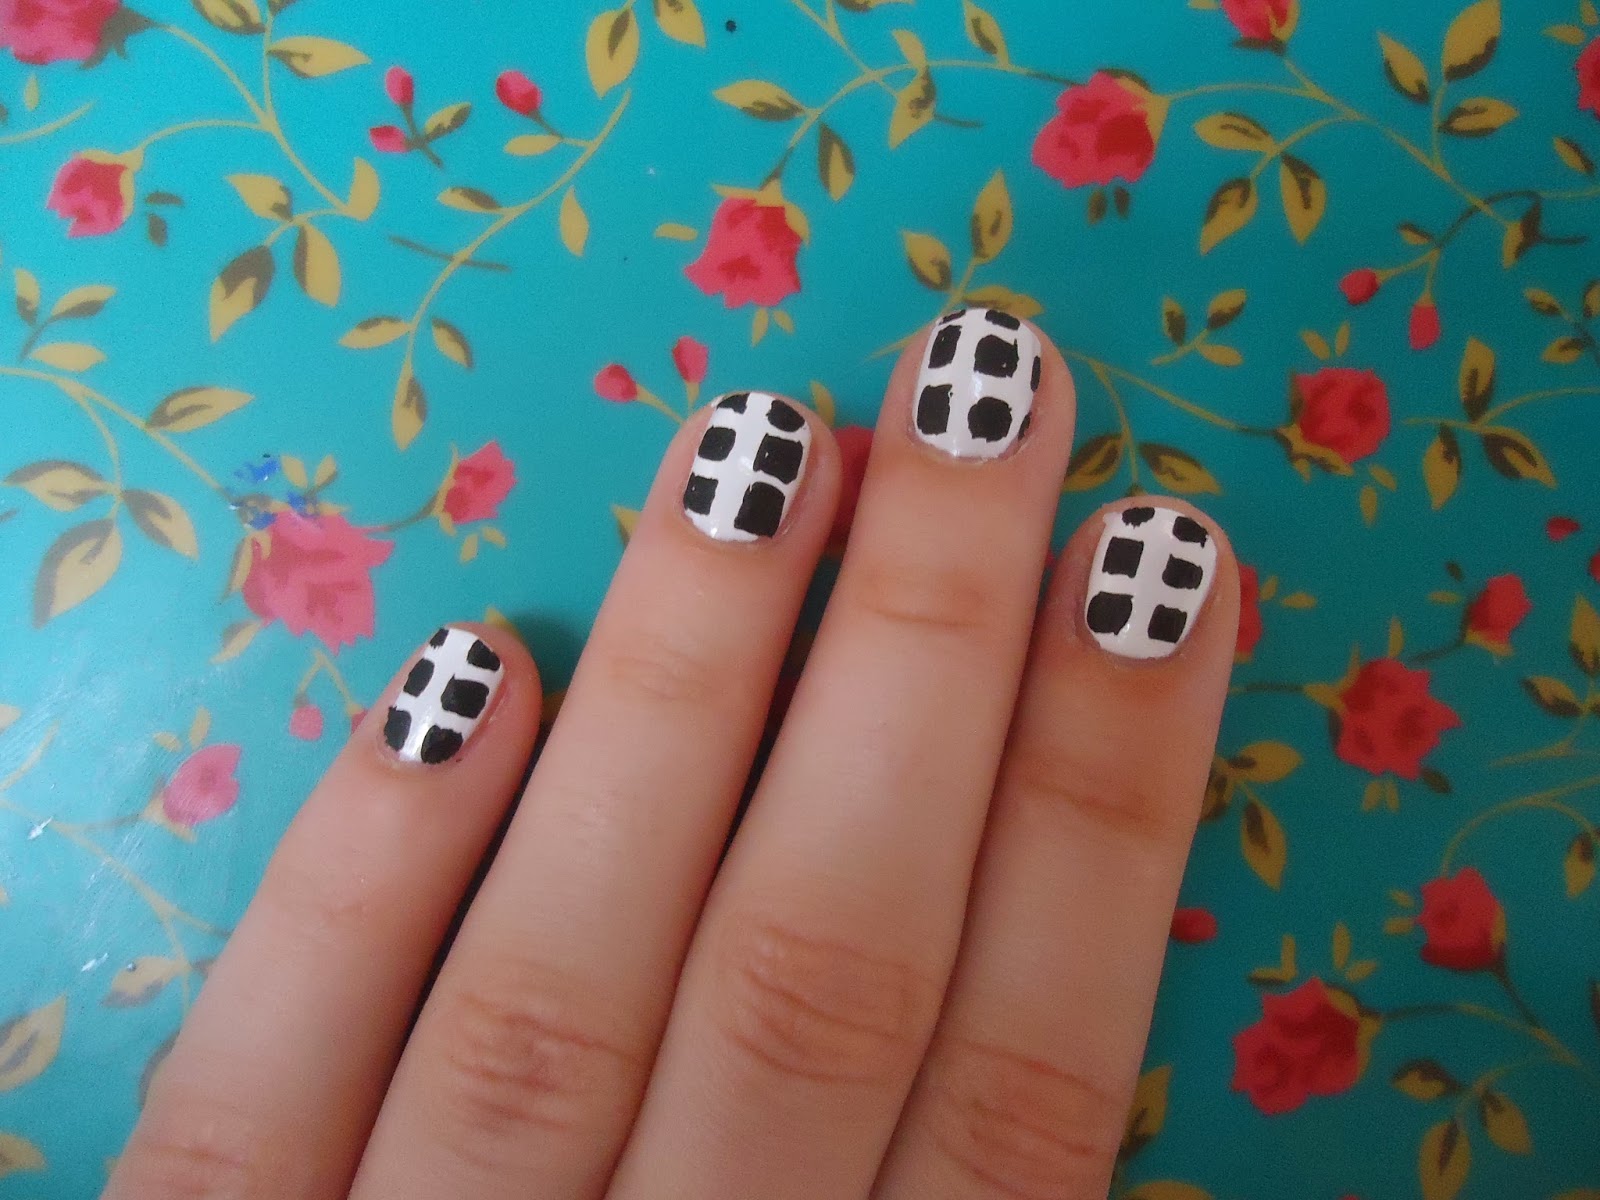
Houndstooth Nail Art

Something I love to do but rarely end up featuring is nail art. I always forget to take pictures of each step! Anyway, I'm going to try and make a conscious effort to show more, and this time I'm sharing something a little more advanced: houndstooth pattern. Up close, it can look a little messy, but from the distance most people see your nails; this looks pretty impressive.


The first thing to do is protect your nails with a base coat, and then get your base colour down. I've gone for monochrome here, but feel free to try different colour combinations!

The way I do this pattern, is to get the basic squares pattern sorted initially (with a nail art pen) and I find by drawing lines first this helps with the spacing. Then add lines to opposite corners of the squares, and 'bunny ears' to the top corner in between.

Finish with top coat and you're done! This design is certainly easier said than done, it's pretty fiddly and time consuming, so approach this with plenty patience and a steady hand!

Sunday, 3 August 2014

Macarons Made Easier

Macarons are known for being fancy, but also tricky to make. I haven't had the opportunity to actually bake for a while, but I wanted to share some of my tips on making macarons easier!

Of course, once you've got the hang of the basic recipe, you can start adding other flavours (I find it easiest to do this via the filling as the consistency of the macaron mixture is quite important). The ones you see below have actually been made with ground pistachios instead of almonds, and they were delicious! (If I do say so myself.)

A quick note on the difference between macarons and macaroons: macarons are what you see below, macaroons are made with mostly desiccated coconut.


Ingredients:

For the macarons:
100g ground almonds
100g icing sugar
2 egg whites
50g caster sugar
1 tsp baking powder

For the filling:
100g butter
200g icing sugar

Start by whisking up egg whites into stiff peaks (this is where you can use the bowl-upside-down-over-head testing method) and whisk in the caster sugar, this forms a basic meringue-y mixture.

Combine the grounds almonds, icing sugar, and baking powder; then GENTLY fold them into the meringue. Mix until you have a 'ribbon' consistency, being careful not to over-mix.

Transfer to a piping bag, and pipe equal blobs onto greaseproof paper lined baking trays, leaving sufficient space for them to spread. Bang the trays onto a flat surface to remove any air bubbles and leave for 30 minutes to form a hard shell - this helps form the 'feet' of the macarons.

After an outer shell has been formed, place trays in a preheated 180°C oven for around 8-10 minutes. Keep an eye on them so they don't over-bake! Once baked, leave to cool on the tray, and once completely cooled, then you can peel them off the greaseproof paper.

For the filling, buttercream is always a winner, made simply by mixing butter and icing sugar, then piping onto half of the macarons before adding lids.

Monday, 28 July 2014

Tomorrow is National Lipstick Day?!


Exciting times! Tomorrow (Tuesday 29th July) is apparently National Lipstick Day and to celebrate, Debenhams have a lovely offer for one day only: £5 off any full price lipstick! (online only)

If you follow me on Twitter, then you'll know that last week I managed to miss both Batman Day and National Tequila Day, so I think I might take advantage of Debenham's offer, particularly as they've also got Mystery Gifts with online purchases above £5.

It seemed rude not to share this offer I stumbled across; so if you've had your eye on a high-end lipstick, or feeling like treating yourself - now is the perfect time! Debenhams lipstick range can be found here.

Sunday, 27 July 2014

Weekend Wishlist #7

Haven't done one of these posts for a while! I'm forever lusting after things, but currently my ongoing wishlist is rather large so I thought I'd share it here! (Spoiler alert, it's very Nars heavy...)

Zoeva Rose Golden Luxury Brush Set - £53.50 here
I love Zoeva brushes and rose gold, and these are just lush as well as being great value (working out at about £6 per brush). It's been out of stock for quite sometime but now it looks like this is back in stock so I'm very tempted to snap it up!

Nars Velvet Matte Lip Pencil in Roman Holiday - £18 here
I tried this during my Nars makeover, and it's pretty much my perfect pink colour. Technically, I've already ordered this from my nearest Space NK, I'm just hoping it arrives before I go back home!

Urban Decay Ink for Eyes - £15 here
My liquid eyeliner recently ran out, so I'm looking for a replacement. This is a fairly new release from Urban Decay and the felt-tip style of this looks super easy for application.

Nars Eyeshadow Duo in Meditarenee - £25 here
These orangey shades really brought out the blue in my eyes during my Nars makeover and are gorgeous colours for summer. Again, I've already ordered this from my nearest Space NK, fingers crossed they arrive soon.

Nars The Multiple in Copacabana - £30 here
Another product discovered during - you guessed it - my Nars makeover. This creamy highlighter is stunning so easy to apply, but perhaps a little pricey.

OPI Miss Piggy's Big Number - £8 here
This picture doesn't do that colour justice! I saw this on someone's nails on Instagram, and fell in love.

Nars Dual Intensity Eyeshadows in Himalia and Subra - £21 each here
Soft, buttery, pigmented eyeshadows? And these colours would be so wearable... these are pretty high on my want list right now, but can I justify £21 for an eyeshadow?

Marc Jacobs Daisy Dream Eau de Toilette - £50 here
I haven't actually smelt this yet, but I can't think of a single Marc Jacobs fragrance I don't like, and the notes sound like they are to my taste. Plus, how pretty is that bottle?!

Wednesday, 23 July 2014

Heatwave Heroes

Blimey we're having quite the epic summer in the UK! This is the most consistent summery weather I think I've seen, and it certainly beats the usual 2 day affair we get.

I'm the kind of person who would rather be too warm than too cold, but a girl's got limits, and I thought I'd share a few of the ways I've been coping with the heatwave! (Of course, this is where having a summer job in an air-conditioned office is both a blessing and a curse.)


The ultimate hero of the bunch, are these Cyber Colors blotting papers. I'd never really considered them before, but picked some up on a whim while in Hong Kong, and they've certainly come in handy recently. Personally, I don't find powder helpful in terms of keeping oil at bay - but blotting papers? You can say good bye to that shiny face, while still leaving all your makeup intact. Oustanding stuff.

A lovely skincare combo I've been using is the Yes to Cucumbers Soothing Facial Wipes and Super Facialist Tea Flower Pore Purifying Clay Mask. The face wipes are lovely and refreshing, and with the cooling effect of the clay mask, this is a lovely treat on a hot weekend.

Of course, I have to mention some summer staple accessories: hair clips are fantastic for keeping my massive amount of long hair off my neck and back (thank heavens messy buns are 'in'), and sunglasses protect my eyes and vision, and mirrored ones are useful for quick hair/makeup checks!

Sunday, 20 July 2014

Nars Makeover

Orange eyeshadow isn't really a colour I've considered wearing before. That was until I had my Nars makeover on Friday, and discovered how it could be used to really make my blues eyes pop.

Nars are currently touring a few Space NK's across the UK to launch and promote their new Dual Intensity eyeshadows. I booked my appointment and eagerly waited. 

The products used for my look were (all Nars obviously):
- Multiprotection Primer
- Sheer Matte Foundation in Mont Blanc
- Radiant Creamy Concealer in Vanilla
- Pressed Powder in Flesh
- Smudgeproof Eyeshadow Base
- Mediteranee Eyeshadow Duo
- Dual Intensity Eyeshadow in Himilia
- Larger Than Life Eyeliner in Martelli
- Larger Than Life Lengthening Mascara
- Brow Perfector in Caucase
- Brow Gel in Oural
- Laguna Bronzer
- The Multiple in Copacabana
- Desire Blusher
- Roman Holiday Velvet Matte Lip Pencil

The Dual Intensity eyeshadows are absolutely beautiful with a soft buttery texture. Some shades are more pigmented than others, but you can apply them wet as well as dry so the less pigmented shades become more pigmented.

The shade Himilia used on me looks so versatile, as an all-over-the-lid colour, or in brighter looks like this one, or even with a bit of black through the crease for a smoky eye. The only downside is that they are rather pricey at £21 each.


Throughout the makeover, and even afterwards, there was absolutely no pressure to buy anything, but I did opt to try the Sheer Matte foundation, as my Sheer Glow has just run out (look out for a comparison post soon!). I've also ordered the Mediteranee Eyeshadow Duo and the Roman Holiday Velvet Matte Lip Pencil, which were used for my look.

As part of the event, everyone got a face chart of their look, and a little gift bag of treats. A deluxe sample of tinted moisturiser, miniature eyeliner, and the cutest miniature size of blusher in Deep Throat.

I also picked up some great tips from the makeup artist, and it seems only fair that I share the love!
- Use brown eyeliner in the waterline for a less harsh look than black
- Gently lift up the hood of the eye while applying eyeshadow to the crease
- Apply blusher in a U shape on the apples of the cheeks, for a more natural look (and avoid clown cheeks!)
- Use highlighter liberally! Cream highlighters (such as the multiple) work well, applied right across the cheekbones to the hairline
- If you have thicker brows like me, only apply brow colour through the bottom of the brow, to add definition
-Don't bother with brown or clear mascara, it's not worth the money!

There are still some dates left for this Nars event over the next week (more info here), so if you can get yourself to one of the participating stores I would highly recommend it. If not, the Dual Intensity eyeshadows are now available to buy, along with everything else by Nars. I know I have a wishlist about a mile long now...

Thursday, 17 July 2014

Summer Nail Art


I posted these nails on Instagram the other week and got a really positive response, so I thought I'd share them here too!

After exams and plenty of end-of-year celebrations, it had been a while since I'd attempted any real nail art so I thought I'd have a little practice of patterns, mixed in with some other summery designs like fruit and florals!

I started off by having a gradient of colours (from blue to green) across my nails, and then alternated between basic patterns and more intricate designs to keep things interesting but not over-the-top. I used a combination of nail stripers and nail pens for the various patterns, depending on how thick/neat I needed the lines to be.

Let me know if you'd like any tutorials on these!

Sunday, 13 July 2014

Have You Discovered...? Storage Ideas

Back to the Have You Discovered...? series, and I think this is the last category I'll be joining in with. It's been a fun collaboration to be involved with, and I've certainly been inspired to write more creative posts.

This week's theme is Storage Ideas, so I thought it would be appropriate to talk about a recent addition to my beauty products - this Roo Beauty Nail Polish Roll (£7.99-£16.99).


Personally, I think this is a genius idea. An organised way to store nail polishes for travel, that prevents them from getting damaged? I'm in! This nail polish roll stores up to 12 nail polishes, of various sizes, as you can see above. Thanks to each individual elasticated compartment, the nail polishes aren't bashing against each other during travel, so they're not very likely to smash and spill everywhere.

Because I like to do nail art, that means I tend to need a number of colours at one time, so this is perfect to roll up and take with me. Mine has a leopard print design, but they come in a range of patterns and colours to choose from!

How would you store your nail polishes?

xxx

Wednesday, 9 July 2014

Beauty Travel Essentials

This week, as part of my summer engineering placement, I'm attending a three day event in Lancaster. It's going to be pretty varied, from networking events and a formal dinner, to factory visits and outdoor team-building activities.

Obviously I'll need makeup that goes from day to night, but at the same time I don't really fancy taking my entire makeup collection! So this post is kind of a cross between being nosy at what I'm taking with me, and some of my tips for keeping makeup travel-friendly!


I've got my beauty travel essentials pretty much sorted (obviously I'll have other things like toothbrush, toothpaste, deodorant etc but those are boring).

Skincare-wise, I've kept it simple by taking multi-tasking face wipes. These Yes to Cucumbers facial wipes are gentle on the skin, while being able remove makeup and cleanse. I wouldn't use these every day, but they take up far less space than taking my entire skincare routine (although I might sneak an extra moisturiser into my case).

For makeup, my Z Pallette comes in really handy, because I can fit a range of eyeshadows, a blusher, and a bronzer (all depotted of course). Base-wise, a travel sized primer is useful, and putting a smaller amount of foundation into a sample pot is a great way of saving space (foundation bottles can be so bulky!)

This 2-in-1 mascara does both top and bottom lashes, and I think I'd be lost without liquid eyeliner for cat eye flicks! I'll be taking just one lipstick, in a wearable pink colour that can be worn with anything, and my Travalo perfume spray (same concept as taking less foundation).

And finally, when it comes to cutting down on the number of brushes to take, multi-tasking and double-ended brushes are your new best friends!

xxx

Sunday, 6 July 2014

Have You Discovered...? Beauty Tools

I've missed the last few weeks of this series (I'm blaming it on the busy life), but I'm back with this week's theme: Beauty Tools.

I had originally planned to talk about some of my favourite makeup brushes, but as I was washing my face this morning, I struck inspiration and decided to tell you about one of my favourite little skincare helpers instead!


Since this is a series about discovery, and I'm not sure how many people will have seen this, it seemed like a perfect opportunity to introduce it. This strange green thing you see above is a silicon exfoliating face disc.

It's the perfect thing to use for cream/balm cleansers, but you could use it with foaming products too. It's effective enough at exfoliation but gentle enough to use every day. I honestly can't imagine my skincare routine without this, and it's way better value than a Clarisonic (or other similar electric facial exfoliator thingy),  takes up less space, and won't get tangled bristles like a facial cleansing brush.

I picked mine up in Sephora back in February for about 5, but I've seen similar ones for a couple of quid on eBay, which is where my mum got hers after I raved about mine.

xxx

Monday, 30 June 2014

Update and Giveaway

Well hello, long time no see! I got so caught up in the end-of-year celebrations and prepping for my summer placement... and then I ran out of draft posts. Oops.

During the time I've been gone, my blog turned one year old! Instead of having a cake, I thought I'd have a giveaway instead. For this one, I've put together my own 'Beauty Box' of 15 items, including some of my absolute favourites.


The Rules:

- Giveaway runs until 30th July 2014.
- UK only (sorry, postage is expensive/risky otherwise).
- Must be following this blog.
- Please leave a contact email, if no response within 48 hours I'll choose a new winner.
- No 'giveaway accounts' please.

a Rafflecopter giveaway

Good luck entering!

xxx

Wednesday, 11 June 2014

Ingredients To Avoid For Blemish Prone Skin

 I've wanted to write this post for a while, about some of the ingredients I avoid to improve the health of my skin. I never really used to pay attention to specific ingredients, but then I noticed a connection between breakouts and products I was using that had the same ingredients in. 

Of course, different products/ingredients affect different people's sin differently (okay, I'm done with the word different now), but after a bit of time and research; these are the ones I've found to have an adverse effect on me (please don't ask me to pronounce half of these!):

- sulphates: SLS/ALS
- foaming ingredients - generally products which foam up tend to irritate my skin
- mineral oil - a lot of cheaper skincare uses this, and it has a tendency to clog up pores (not ideal)
- steareth 10
- propylene glycol
- monostearate isopropyl
- mysistate cetyl acetate
- lanolin

I thought it might also be helpful to include some of the ingredients I look out for as being good for my skin, particularly for breakouts:

- manuka honey - such a miracle product really, it's good for the complexion and great for your insides too
- salicyclic acid - quite a well known one for breakouts
- tea tree - reduces redness
- witch hazel
- clay - good for controlling oil

Are there any ingredients you avoid/look out for?

xxx

Sunday, 8 June 2014

Have You Discovered...? Mixing Lipsticks

I'm taking a different approach to this week's #HaveYouDiscovered, instead of talking about one product I've discovered, I'm going to share a technique: mixing lipsticks.

I'm sure this isn't breaking news to everyone, but it's something I never thought of until recently.

Lately I've craving the brightness of one lipstick I have, with the matte effect of another, so one day I decided to layer them up and voila! The lipsticks in particular I'm talking about? That would be Urban Decay Super Saturated Lip Colour in Crush and MAC Matte Lipstick in Please Me.


What I love about this method, is that you're effectively getting a new lipstick for free! I'm keen to try out other combinations, obviously some won't work, but I think it's a great way to get more use out of unloved lipsticks.

xxx

Friday, 6 June 2014

May Favourites

Time to talk about monthly favourites again - I can't believe it's June already! The sun is finally shining, I've finished 3rd year of uni, and there's definitely a summer vibe going on. Bring on the BBQ's!


1. Fairydrops Long and Curl Mascara
I talked about this mascara here, I love the packaging and the speed of application!

2. Mavala Nail Polish in 147 Tangerine
This is such a lush colour for summer, bright orange but without being too in-your-face, and it has a beautiful sheen in the sunlight.

3. Vaseline Spray & Go Body Moisturiser
I'm a bit late to the bandwagon with this one, but now I can't imagine using another moisturiser. I am very lazy with moisturising, and hate waiting around for it to sink in, so frankly this is right up my street!

4. Elie Saab Le Parfum Eau de Parfum
This had been on my wishlist for some time, and now I have it in my collection I can't get enough of it! It's very much an evening scent, very sophisticated and oriental-y but still fresh and not too heavy. It also lasts a long time - I can still smell it in my hair the next morning after a night out!

5. GHD IV Pastels Jade Styler
Who doesn't love a good pair of GHD's? I have thick hair, and I find other brands of straighteners just don't work nearly as well. It's also nice to have ones which also curl my hair (my previous ones were wide plate) and the colour makes them stand out on my dresser.

xxx

Sunday, 1 June 2014

Have You Discovered...? Fairydrops Mascara

The Have You Discovered...? series returns! This week's theme is mascara, and like most females; definitely a product I rarely leave the house without!

It seems slightly cheeky to talk about a brand that isn't readily available in the UK, but I have found it on eBay, so you could always try it that way!

Even though it is a cult Japanese product, I got mine back in April when I was in Hong Kong. I'd heard about it on youtube I think, and I was certainly intrigued by the unusual wand shape!


I got the Long and Curl version and the combination of the 'bubbled' wand and the curved shape make it hold a curl really well (great for me because I have a weird fear of eyelash curlers). I would however, consider it to be more of a volumising mascara than a lengthening one. There's something about the thick formula that really sticks to the lashes - this stuff doesn't budge (until you want to remove it obviously). I do find that if you try and layer this up, there is a tendency to end up with clumpy lashes, but this mascara does the job in one go anyway so there's no need for lots of layers.

One other thing that definitely needs mentioning, is the packaging! Is it possible to be in love with a mascara packaging? Because I think this is so pretty, and all the variations of Fairydrops mascara are different colours.

Overall, I really like it. It has all the qualities I look for in a mascara, and does an excellent job.

xxx

Wednesday, 28 May 2014

Las Vegas Stylin'

Back to the fashion posts for today! I was approached by vegas.com to take part in their #MyVegasStyle challenge: creating multiple looks for a day and evening at the Aria Resort and Casino.


My first look is for chilling by the pool, something I could definitely get on board with! I actually recently bought the sandals I've included; I think they're so pretty and different. The star of the outfit, however, has to be the bikini, from the already hyped brand Triangl.


For the rest of the day, I've switched up some accessories, but kept a few the same for an easy transition. With the warm weather I probably should've chosen shorts, but I really like these jeans and wanted to incorporate them into an outfit.


And finally, for the evening, I've kept a similar colour scheme but gone for a much more dressed up outfit. I'd love to wear this, but I struggle to find jumpsuits that fit my leg length (tall girl problems).

Las Vegas is definitely on my bucket list, and if I won the lottery I'd hop on a plane (first class obviously) right away and wear all of these things!

xxx